Showing posts with label Easy tea time snacks. Show all posts

Wednesday, March 30, 2016

Vegetable Cutlet Recipe


veg cutlet


Vegetable Cutlet is our family favorite dish and I used to prepare it mostly on saturday evenings when my sons friends come home and play in our house, and munching this yummy and healthy snack with tomato sauce. Alternatively I also do the Prawn cutlets or the soya chunks cutlet. Also Sometimes I shallow fry and sometimes I deep fry the veg cutlets. My kids n his friends like the deep fried vegetable cutlets more. 

You can check other Evening Tea Time Snacks below 


Vegetable Cutlet Recipe

Preparation time: 25 min | Cook Time: 10 min | Serves: 4
Recipe Category: Snacks | Recipe Cuisine: Indian


Ingredients 
Vegetables (Fresh or frozen) - 1 cup
Potato - 1 big
Chilli powder - 1 tsp
Coriander powder - 1/2 tsp
Turmeric powder - a pinch
Garam masala - 1/4 tsp
Green Chilli - 1 chopped finely
Coriander leaves - few chopped finely
Bread slices - 3
Bread crumbs - 1 cup
Maida / All purpose flour - 1 tbsp
Corn flour - 1/2 tbsp
Water - as needed
Salt as per taste


Method to prepare Vegetable Cutlet

1. Pressure Cook the potato for 2 whistles and other veggies for 1 whistle. ( This time I used frozen veggies and one whistle is enough. For fresh veggies use 3 whistles). Drain the water completely. 


2. Add the veggies and the potato and smash them nicely. To this add the chilli powder, coriander powder, cumin powder, garam masala, green chillies, turmeric powder, salt and mix them well. 

3. Grind bread slices to powder firm and add to the smashed veggies. Add the coriander leaves too. 


4. Mix them nicely. Take a little portion of them and make into desired shapes, I normally used to make in round and heart shaped. Keep them aside. 


5. Mix the corn flour and all purpose flour to form a paste and keep it ready in a bowl. Also keep ready the breadth crumps. 


6. Now take one piece of cutlet and dip in the APF paste and immediately toll on the bread crumps, so that they are fully coated with bread crumps. 

7. Let them rest for 5 min. Meanwhile start heating up the oil and once hot drop the cutlet one by one and deep fry them until they turn light brown color on all sides. Do not overburn it. 

8. Filter out the oil and serve the vegetable cutlets with tomato sauce.


Yummy Vegetable cutlet is ready to be served


Notes:
1. Instead of all purpose flour mixture, you can use egg as binding agent. 
2. You can also shallow fry the cutlets, but as my kids want deep fried, I did the deep fried version here. 
3. You can add any veggies. Adding beetroot gives nice colour to your cutlets. 


Tuesday, July 7, 2015

Sweet Maida Biscuits | Maida Biscuits | Easy Diwali snacks

sweet maida biscuits

Sweet Maida Biscuit is the easiest biscuit which can never go wrong, even for the first timers, if you follow the steps correctly. This one is my favorite biscuits from my childhood days. I have another easy snack which is my moms favorite called Galagala. Those are tiny spicy crispy biscuits. But I like this sweet maida biscuits more and Want to try the baked version soon. Let's see the how to make the Sweet Maida Biscuits. 

You can try the other easy snacks from this blog

Sweet Maida Biscuits

Preparation time: 10 min (resting time: 30min) | Cook Time: 10 min | Serves: 4
Recipe Category: Snacks | Recipe Cuisine: South Indian

Ingredients 
Maida / All Purpose flour - 1.5 cups ( + or - )
Butter - 1/4 cup (Room temperature)
Powdered Sugar - 1/4 cup
Milk - 4 to 5 tsp ( + or - )
Baking powder - 2 pinch
Salt - a pinch
Oil - for frying

Method 
1. Mix the Butter and powder sugar nicely in a big bowl, until they become creamy. 
2. Add the milk now and again mix it. 

3. Sift the flour and baking soda nicely, and add to the butter sugar mixture. 

4. Mix them to form a pliable dough. ( should be like chappathi dough ). 

5. Let them rest for 30  to 40 min.

6. Now divide the dough to equal portions and roll them to 1/4 inch thickness. (see notes)

7. Cut into small squares or in diamond shape. 

8. Heat the oil keeping the flame in low to medium. This is must. If it is high or medium flame, outside gets cooked easily but inner part never get cooked. 

9. Drop the dough squares in batches and fry them until they get cooked evenly and colour comes to light brown.

10. Filter the oil and cool down. 

10. Store in an air tight container. 

how to make sweet maida biscuit

Yummy and crispy sweet maida biscuits are ready. 

Notes:
1. If the thickness is less than 1/4 inch, it will break while frying.
2. The biscuits will be soft at first, but becomes crispy when cools down. 
3. You can add a pinch of cardamom powder for flavor. 
4. Milk and butter should be in room temperature. 

Tags: , , , , , , , , , , , , , ,

Tuesday, August 5, 2014

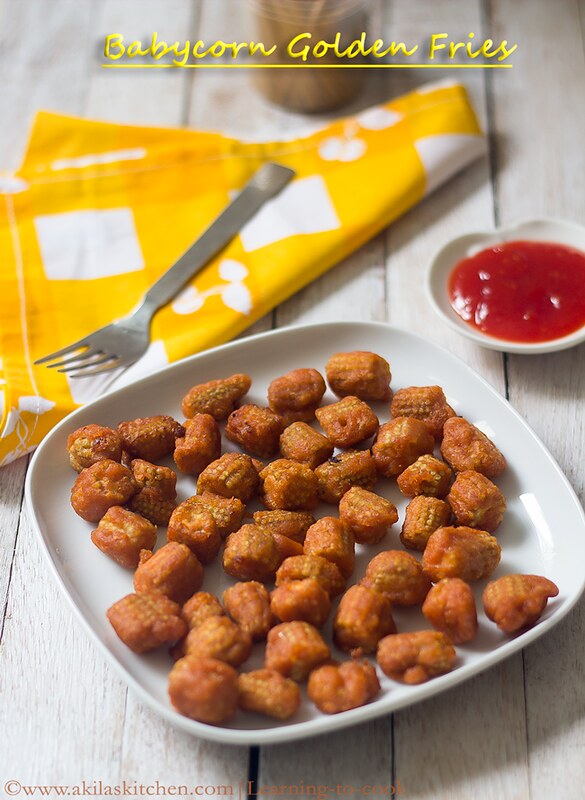
Baby corn golden fry | How to make Golden Baby corn fry | Baby corn recipes | Easy evening snacks | Kids snacks recipes


how to make golden baby corn fry


Baby corn golden fry is one of my favorite evening snack. It can be either deep fried or shallow fried. It purely depends on our choice only. I already have baby corn 65 recipe which is also a deep fried one, as I like deep fried instead of shallow frying. One of my friend mentioned, we can do this in microwave also. Need to try that too. But now lets see the Baby corn golden fry.

Some snacks and baby corn recipes, I have given below
Baby corn 65
Onion Pakoda
Crispy cauliflower fry
Vegetable cheese balls


how to make golden fry baby corn

Baby corn golden fry

Preparation time: 15 min | Cook Time: 10 min 
Total Time: 25 min | Serves: 3
Recipe Category: Snacks | Recipe Cuisine: South Indian


Ingredients
Baby corn - 2 packets (12)
Rice flour - 2 tbsp
Corn flour - 1.5 tbsp
Ginger garlic paste - 1 tsp
Red chilli powder - 1.5 tsp
Garam masala powder - 1/2 tsp
Curd / yogurt - 2 tbsp
Water - as needed
Salt - as per taste
Oil - for frying
Chat masala - 2 pinch for taste


Method
1. Wash and remove the stem of baby corn. Cut into round shape. Soak in boiling hot water for 8 to 10 min. (See notes)


2. Pat it dry. Mix the Rice flour, Corn flour, All purpose flour, garam masala, chilli powder, salt and curd to the baby corn and mix well.


3. Mostly the adding of curd would be enough to make it a batter consistency. If not, sprinkle little amount of water and allow the marination to rest for 30 min.


4. In a vessel, add oil and when it hot enough, add the baby corn in small batches and rotate them slightly so that, they get fried evenly in all the sides. When you get the golden colour or the issshhh sound of the baby corn, ceases, remove from oil and filter the excess oil in kitchen towel.


5. Sprinkle some chat masala and Serve it hot with the ketchup.
baby corn golden fry

baby corn fry

Yummy yummy Baby corn golden fry is ready to be served

Notes:
1. If the baby corn is small, you can avoid soaking in hot water and just add them directly to batter and fry it. If the baby corn are bigger than regular size, then I may suggest you to pressure cook for 1 whistle and then prepare as mentioned.
2. My friend suggested to add a pinch of cooking soda, for even more crispier fries. But I avoided as I prepared this for my kids.
3. You can also add a pinch / drop of red food color, for the vibrant red color.


Tags:, , , , , , , , , , , , , , ,

Saturday, April 19, 2014

Cabbage Pakoda | Cabbage Pakora | Cabbage Fritters | How to make cabbage pakodi | Easy Evening Snacks | Tea Time Snacks


cabbage pakora

Cabbage Pakoda or Cabbage pakora is an easy evening snack. My hubby, bought 1 kg of big cabbage last week. After scolding him😒 for buying so much big cabbage, i prepared cabbage sambar, cabbage poriyal, but still i had another 1/2 kg of cabbage. So while browsing for some recipes, i saw this cabbage pakora in one of the site and tried the same method, as we do for onion pakora. It came out as a crispy snack and I am happy😜 that I finished my cabbage finally. I normally prepare the cauliflower pakora or the crispy cauliflower fry as evening snack and this cabbage pakora has now become one of our family favorite ☺️ .


cabbage pakoda

How to make Cabbage Pakoda

Preparation time: 15 min | Cook Time: 15 min 
Total Time: 30 min | Serves: 6
Recipe Category: Snacks | Recipe Cuisine: South Indian


Ingredients

Cabbage - 1.5 cups
Small Onion / shallots - 1/2 cup (chopped finely)
Besan flour - 3/4 cup
Rice flour - 1/2 cup
Corn flour - 1 tsp
Chilli powder - 1.5 tsp
Turmeric powder - 1/5 tsp
Baking soda - 3 pinch
Green chillies - 2 finely chopped
Coriander leaves - 3 tbsp (chopped)
Curry leaves - 2 tbsp (chopped)
Fennel seeds - 1 tsp
Salt - as per taste
Oil - for frying
Water - as needed or around 5 tbsp ( for sprinkling )


Method

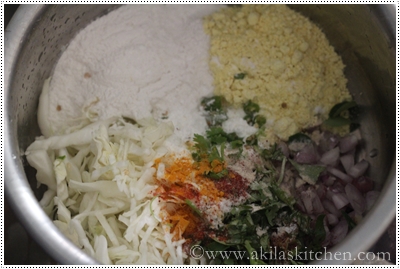
1. Chop the cabbage lengthwise. Add the ingredients from Cabbage to salt and mix them together.

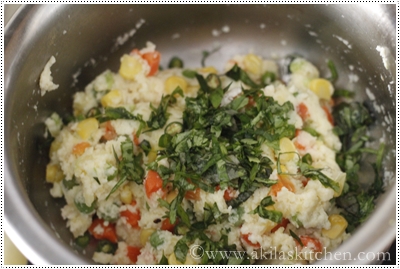
2. Sprinkle little water tsp by tsp and mix them well, until they form a dough like consistency as shown bellow. Leave it for 5 min to rest.

3. Heat the oil in medium flame. Take little portion of the pakoda dough and fry in the oil. Do the same for the rest of the dough. When the pakoda becomes light brown in colour on all the sides, remove from oil and filter the excess oil.

4. Serve it hot with a cup of tea or coffee. Any mint chutney or tomato sauce would be a great accompaniment.


cabbage fritters

Easy Cabbage Pakoda / Cabbage Pakora is ready for evening snack

Friday, March 28, 2014

Vegetable Cheese Balls | Party Snacks Recipes | Kids snacks Recipes | How to make vegetable cheese balls | Veggie Cheese Balls | Easy Snacks Recipes


corn cheese balls

Veg cheese balls or vegetable cheese balls or veggi cheese balls is such a tempting snack that kids would love to have it. When I tried these and gave to my kids they finished it fast and asked some more and again I did another batch for myself and my hubby. These can be done for any parties or for guests and I assure you, you will get praised for these. I got the idea from here but changed to my taste. Need to try the original version also. Let's see how to prepare these veg cheese balls. 

You can also view some evening snacks if you like

cheese balls

How to make Veggie Cheese Balls

Preparation time: 15 min | Cook Time: 10 min 
Total Time: 25| Serves: 6
Recipe Category: Snacks | Recipe Cuisine: International

Ingredients


Mixed vegetables - 1.5 cups
Potato - 3 small (around 75 to100 gms)
Paneer - 1/2 cup or 100gms

Cheese - 6 tbsp ( increase or decrease as your wish ) (you can use mozerella or cheddar cheese)
Corn flour - 2.5 tbsp
All purpose flour - 1/4 cup ( + or - )
Green chillies - 2
Coriander leaves - 4 tbsp (chopped)
Milk - 1/4 cup
Baking soda - 1/4 tsp
Breadcrumbs - as required
Salt - as per taste 

Oil for frying

potato cheese balls


Method


1. Cook the mixed veggies with little salt until soft. Boil the potatoes and peel off its skin. 


2. If you are adding frozen paneer, Soak it in hot water for 3 min, squeeze slightly and then add it. If you are using fresh paneer just add as it is. Add the cheese. Mozzarella cheese does good work.

3. Chop the green chillies and coriander leaves finely and add it.

4. Add the required salt, all purpose flour, baking soda and mix well by crushing the vegetables and other ingredients as far as you can. Make a dough has shown below.

5. Make small equal balls and dip the balls in the milk. Immediately roll the balls in the breadcrumbs.

6.  Again slightly dip the balls in the milk and roll the balls in the bread crumps mixture again until the bread crumps are coated well. Do the same for all the balls. Let it rest for 10 to 15 min in fridge. Now Heat the oil in medium and drop the balls slowly.

7. When the balls turns golden colour or light brown colour, remove it and filter the oil. Do this process in small batches.

8. Yummy and addictive veg cheese balls are ready. Serve with tomato sauce or chilli sauce.


veg cheese balls


Yummy Veggie Cheese Balls is ready and tastes great with the Chilli Sauce

Related Posts with Thumbnails

My Wonderful Followers

Ads

Add to the circles

Learning-to-cook   © 2008-2015. Template Recipes by Emporium Digital

TOP  

//