Friday, February 27, 2015

Muttai Kuzhambu | Egg Poached Curry | How to make Muttai Kuruma | Easy Indian Egg Recipes | Sunday Special Recipes


muttai kulambu

Many people do this Muttai Kuzhambu in various ways. But rather than adding hard boiled eggs to the Kuzhambu I like to break the egg and add it. I feel I love the taste more when info like this... You can see my egg kurma post, for adding hard boiled eggs. Let's see how we can do the egg poached curry. 

Below are some Egg Recipes for you to view...


muttai kurma

Muttai Kuzhambu Recipe

Preparation time: 15 min | Cook Time: 20 min | Serves: 4
Recipe Category: Main | Recipe Cuisine: South Indian


Ingredients

I - Spices
Fennel seeds - 1/4 tsp
Cinnamon stick - 1
Cloves - 6 to 7
Star anise - 1
Bay leaf - 1

II - To grind
Grated coconut - 1/4 cup
Green chilli - 1
Fennel - 1/4 tsp
Poppy seeds - 1/4 tsp


For Gravy
Eggs - 4
Oil - 2 tbsp
Onion - 2 chopped nicely
Green chillies - 2 chopped nicely
Tomato - 2 chopped nicely
Ginger garlic paste - 1 tsp
Turmeric masala - 1/2 tsp (optional)
Salt - as per taste
Water - as needed
Coriander leaves - for garnishing

Muttai Kuzhambu

Method


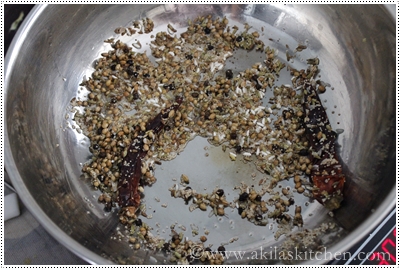
1. In a kadai, add oil and when hot, Add the ingredients I and fry for a min. Add the opinions and fry till translucent.


2. Add the green chillies and the ginger garlic paste. Fry it till the rawa smell of ginger goes. Addin the tomato and sauté it.


3. Mean while take the ingredients in II to grind and grind to a coarse paste. 


4. To this add half of the sautéed onion tomato mixture. Again grind to a coarse paste and keep ready.


5. To the remaining half of the onion tomato mixture in kadai, add the salt, turmeric and coriander powder. Fry for a min. Now add the ground paste and sauté them for a while.


6. Add required water and allow to boil. Add the kurma powder and bring to boil again.


7. When the Kuzhambu starts boiling ( you can see the bubbles in top), slightly reduce the flame and break one egg and add the to the Kuzhambu. Again change the flame the high.


8. Repeat the process for all the eggs and let the Kuzhambu just cook for another 3 min in medium flame after adding all the eggs. Do not allow to boil for more time as the egg tends to break in to pieces.


9. Garnish with coriander leaves and serve.

muttai kurma


Yummy and tasty Udaitha Muttai Kuzhambu is ready.

Notes:
1. Never drop the eggs, while the flame is in high, as the bubbles may splash at your hand. Always change to low flame and add the egg and immediately change to high flame.
2. As I said earlier after adding all the eggs do not cook for long time, as eggs break to small pieces. 
3. If you don't like adding eggs directly, you can boil the eggs, make a slit and add the eggs to the Kuzhambu. 


Tags: , , , , , , , , , , , , , ,

Tuesday, February 24, 2015

Vazhaikkai Varuval | Raw Banana Fry | Vazhaikkai Recipes | Side dishes for Rice


Raw banana fry


Vaazhaikai Varuval or Raw banana fry is my hubby all time favorite varuval. He always buys this vaazhaikkai and asks me to prepare this. Since I got bored of preparing this, I used to buy vegetables and stopped him from buying this veggie. But can't stop for a long time right.... He he he... He started buying this again and last week prepared the vazhaikkai varuval and captured for this post. Also there are many methods to prepare this veggie and this is the simplest one. Will see the variations for this varuval in the coming posts. 

You can view other side dishes for rice below

vaazhaikkai varuval

Vaazhaikkai Varuval

Preparation time: 07 min | Cook Time: 15 min | Serves: 4
Recipe Category: Snacks | Recipe Cuisine: South Indian

Ingredients 
Raw banana/vaazhaikkai- 2
Chilli powder - 1 tsp 
Coriander powder - 1 tsp
Ginger garlic paste - 1 tsp 
Turmeric powder - 1/4 tsp
Water to sprinkle 
Salt as per taste

To temper
Oil - 1 tbsp
Mustard seeds - 2 pinch 
Urud dal - 1/2 tsp
Curry leaves - 1 spring 


Method 
1. Wash and remove the edges as shown below.


2. Cut the veggie in thin circles. ( but not so thin)


3. In a bowl mix the chilli powder, coriander powder, turmeric, salt and ginger garlic. Sprinkle little water. Mix the raw banana and marinate it for 30 min.


4. In the kadai or vessel, add the oil and when hot add the mustard seeds. When it starts spluttering add the Urud dal and curry leaves. Now add the marinated raw banana and sauté them till they become light brown in color.

5. Serve them as the side dish for Rasam rice.

Vazhaikkai fry

Easy Vaazhaikkai Varuval is ready.

Notes:
1. Spiciness can be increased as per your taste buds.


Tags: , , , , , , , , ,

Sunday, February 22, 2015

Arachuvitta Naatu Kozhi kuzhambu | Country chicken Kuzhambu | Chicken Recipes


naatu kozhi kulambu


I always love country chicken than the broiler chicken. I feel it is good for health and tastes best, when cooked in a traditional way. This recipe Arachuvitta Naatu Kozhi Kuzhambu I took from a old recipe diary which I brought long before from India. I tried this and came out good. I made this bit watery but you can make it in a thick kuzhambu too. 

You can also view some other chicken recipes if you want....
Simple Chicken Gravy
Chicken Kuzhambu step by step
Kaju Chicken
Nadan Kozhi Curry
Pepper Chicken Chettinad
Chicken 65 - Restaurant style
Karaikudi Chicken Fry

Arachuvitta Naatu Kozhi Kuzhambu

Preparation time: 15 min | Cook Time: 30 min | Serves: 5
Recipe Category: Main Course | Recipe Cuisine: South Indian

Ingredients

For gravy

Chicken - 1/2 kg
Turmeric - 1/4 tsp
Shallots - 15 to 20
Salt - as per the taste
Sesame oil - 2 tsp
Curry leaves few
Coriander leaves for garnishing 

To Roast and Grind

Red chilies - 2
Coriander Seafs  - 2 tsp
Cumin  seeds - 1 tsp
Pepper - 1.5 tsp
Rice - 1 tsp
Sombu / Fennel Seeds - 3/4 tsp
Poppy seeds / Kasa kasa - 1 tsp 


Method
1. Wash the chicken nicely with salt and turmeric.

2. In the pressure cooker add the oil and fry the shallots a bit. Add the chicken pieces, turmeric and salt and sauté for 3 min atleast. Now add 3 cups of water and cook for 5 whistles. (country chicken takes more time to cook)

3.  Take the ingredients mentioned in To fry and grind.

4. In a pan, add 1 tsp oil, and fry the ingredients one by one till light brown. Do not over fry it, as the kuzhambu might taste bitter.

5. Transfer the content to the food processor.

6. Add little water and grind to a coarse paste.

7. In the kadai, add the oil and when hot, add the curry leaves. Then add the coarse paste.

8. Sauté it till the oil oozes out.

9. Meanwhile check the chicken is cooked or not.

10. If cooked, transfer the chicken to the kadai. Allow it to boil. Check for the seasoning and adjust it. ( before transferring, you can take the water and prepare the chicken soup )

11. Let it cook for 7 to 8 min. Garnish with coriander leaves and serve hot.

12. Serve it with hot rice.

Country chicken Kuzhambu


Yummy and delicious Arachuvitta Naatu Kozhi Kuzhambu is Ready.  

Notes:
1. If you want you can add coconut milk to the gravy. 
2. Adjust the chilli according to your spiciness. 
3. Do not over fry the spices, as the Kuzhambu might taste bitter.

Tags: , , , , , , , , , , ,,

Tuesday, February 17, 2015

Ginger garlic paste | How to make Home made Ginger Garlic Paste | Inji Poondu Vizhudhu


Ginger Garlic Paste

I know making of Ginger Garlic Paste is not a big matter for the Indian families and I thought why to do a post for this. But while talking with my colleague one day, she said, she used to buy ready made Ginger Garlic Paste from shops. I asked why she need to buy outside, as we can make it at home easily and told her we can keep it fresh for a month at least and told her the recipe. So I thought, I can write a post for this Home made ginger garlic paste.

Ginger garlic paste

Home made Ginger Garlic paste is easy to do, but the only difficult thing is to peel the garlic skin and peeling the ginger skin as it is time consuming part. But I do this, while watching TV shows or serials, so I don't feel time is wasted or feel much tired. Also to keep the Ginger garlic paste fresh, I add a pinch of turmeric and to extend the self life, I used to add oil and vinegar.

Ginger garlic paste

Home made Ginger Garlic Paste

Preparation time: 8 min (30 to 40 min for peeling the skin) | Cook Time: 0 min | Serves: 200 gms
Recipe Category: Home made | Recipe Cuisine: Indian

Ingredients
Ginger - 1 cup (peeled and chopped)
Garlic - 1 cup (chopped to small pieces)
Turmeric - 2 pinch
Oil - 1 tsp
Vinegar - 1/2 tsp ( I use rice vinegar )

GG paste

Method
1. Take equal amount of ginger and garlic and cut into small pieces. (Equal means, when cut into small pieces, take 1:1 cup ratio).

2. First grind the ginger, with turmeric, oil and vinegar to a coarse paste.

3. Then add the chopped garlic. 

4. Grind it to a fine paste, stopping in between and mix nicely.

5. Save it in a air tight container. 

Ginger Garlic Paste

Home Made Ginger Garlic Paste is ready
Notes:
1. Do not add any water while grinding, as oil and vinegar should be enough to grind. Also adding water, reduces the shelf life of the paste.
2. Always use dry spoon while consuming the paste.
3. Adding turmeric, give nice flavor and color. 
4. Adding oil and vinegar, is to increase the shelf life of the paste.
5. You may also add, a bit of salt, but I did not. 

Tags: , , , , , , , ,

Related Posts with Thumbnails

My Wonderful Followers

Ads

Add to the circles

Learning-to-cook   © 2008-2015. Template Recipes by Emporium Digital

TOP  

//